Tech info pages

Technology information

Tech info pages

Technology information

Tech info pages

Technology information

Tech info pages

Technology information

Tech info pages

Technology information

tech info pages

Saturday, November 24, 2012

Where are stored and How to delete Windows 7 temporary files


Here we are describing you about where the Windows temporary files are stored and how to delete the Windows temporary files step by step procedure. Windows temporary files are the files which are left from previous installation of different applications or files or documents. Windows need these files to run a particular program or task. These files may be increased if not deleted. It may effect to the performance of a computer. Performance of a computer may be decreased by these temporary files.

How to delete Windows 7 temporary files:

·       To view the temporary files click on “Start” menu and search for “run”. Or press “Windows logo key” and “r key” simultaneously.

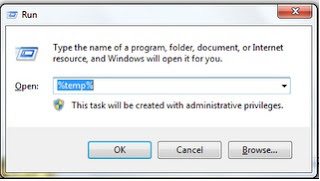
A run box will be opened as shown in the below image. In that Window type “%temp%” and then click on “OK” button.


List of files will be displayed. Select all files and delete them.

Sometimes some files may not be deleted those files are locked due to they are being in use by the Windows Explorer. No need to worry about it. Just skip them.


Tuesday, November 20, 2012

Partitioning Hard Drive Without Formatting in Windows 7 procedure

Partitioning Hard Drive Without Formatting in Windows 7 procedure:
In Operating systems like Windows 7, Windows Vista and upcoming versions we have facility to partition and re-size the hard disk with out formatting your computer. Here we are describing you about how to Partitioning Hard Drive Without Formatting in Windows 7  step by step procedure.

Partitioning Hard Drive Without Formatting:

Step:1
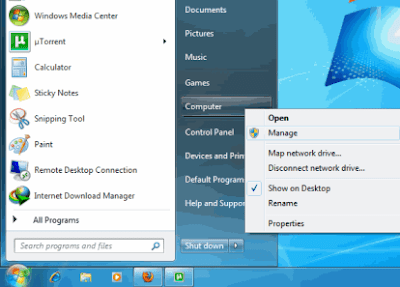
Go to “Start “ menu and right click on the “Computer” option . Select “Manage” option.


partitioning hard drive startup menu

Step:2

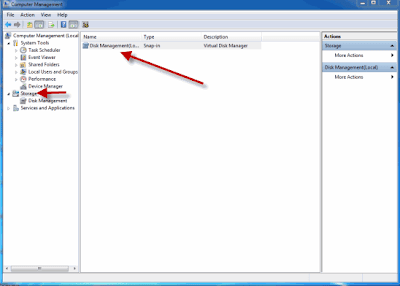
A new window will be opened with title “Computer Management”. Click on “Storage” at left side of window and then click on “Disk Management” as shown in the below image.


partitioning hard drive computer management


Step:3

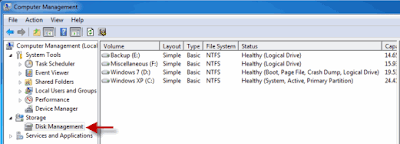
In the next step a window will appear as shown in the below image. All drives in your computer will be displayed in that window. 


partitionig hard drive computer management drives

Step:4

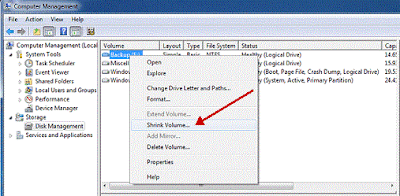
Select the drive in which you want to perform partition.  Right click on the selected drive and then click on the option “Shrink Volume”. 


partitioning hard drive computer management shrink volume


Step:5

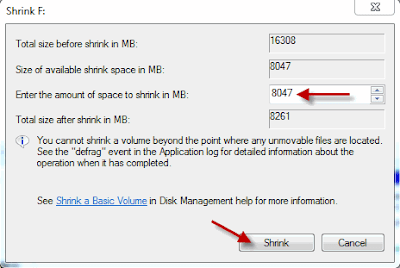
A new window will be opened. In that window Total size of the drive before shrink, Size of available shrink space will be displayed in MB. In the next line you need to enter the amount of space to shrink in MB (i.e. new partition size) and that must be within the limit. In the next line total size after shrink will be displayed in MB.


partitioning hard drive computer management space to shrink

Then click on the button “Shrink” and wait for some time to complete the process. 

Step:6

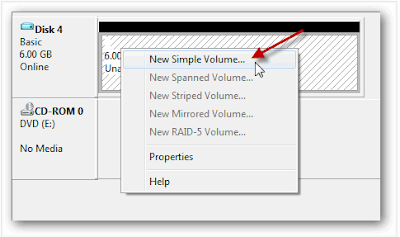
The processing time may be long that will be depended up on the size of the disk and space to be shrunk. After completion of this process a window will appear as shown in the below image.

partitioning hard drive computer management new simple volume

Right click on the unallocated space and then click on “New Simple Volume”.

Step:7

In the next step a wizard will be opened. Go through this wizard and enter the values needed. This Value is same one that you mentioned before as the volume to be shrunk .

A letter should be assigned to newly created drive. Assign any letter to the drive of your choice as that does not make any change.

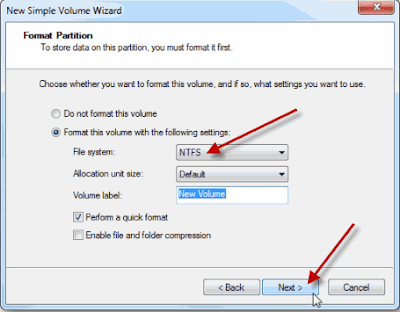
In the next step a format partition window will appear. In that window select “NTFS” File system. After this enter a name of your choice to the drive. Then click on “Next” button and then click  on “Finish”.


partitioning hard drive computer management format partition

The partition of your hard drive without formatting your computer has been completed.


Monday, November 5, 2012

How and steps to install Windows 7 Ultimate installation process

     Here we are describing about how and steps to install Windows 7 Ultimate operating system , installation procedure that will guide you to install.

Steps to install Windows 7 Ultimate


    Before going to install Windows 7 Ultimate operating system you must check the pre-installation Checklist like system requirements, Hardware and Software Compatibility, Disk partitioning options, 32-bit or 64-bit Version etc., 

Step 1 :-

    Insert your Windows 7 installation DVD in to DVD drive. After inserting the DVD reboot your system. If you find a message like “press any key to boot from DVD or CD “then press any key on your key board. You will see a window like bellow image.


Windows 7  Ultimate loading files

After that a window will appear like this.


Windows 7 Ultimate Starting windows


Step 2 :-

In the next step of installation you will see a window like this.


Windows 7 Ultimate language and other preferences

Select Language to install, Time and currency format, Keyboard or input method. Then click on “Next” button. 


Step 3 :-

In the next step of Windows 7 installation you will see a window like this.


Windows 7 Ultimate Install now

Click on the button “Install now” to continue the next step.


Step 4 :-

In the next step a window will appear like this.


Windows 7 Ultimate license terms

Read and accept the license terms then click on “Next” button. 

Step 5 :-

In the next step of Windows 7 installation you will see a window like this.


Windows 7 Ultimate type of installation

In this step two options will be there. Select type of installation do you want.
1).Upgrade:- This option is used for upgrading an existing Windows installation.
2).Custom (advanced):- This option is used for new computers in which the previous operating system is   not exists. 
Select Custom (advanced) button. Because in this installation process we used a new computer.


Step 6 :-

- In this next step you will be asked for where do you want to install windows?

- In this installation process new hard disk had been used which was not formatted before. So we have only option to create a new partition.

-If you have already an existing partition and you want to perform installation on that partition then select that  partition and click on next to begin the installation.

- If you want to perform delete, create, format, extend a partition on hard disk then just click on Drive   options (advanced) and select the options you want to perform.


Windows 7 Ultimate location to installation

If you don’t want to perform any other task like create partitions to install windows then just click on “Next” button to start the installation process.

Step 7 :-

In this step files will be copied from installation DVD to the hard disk.  


Installing Windows 7 Ultimate


Step 8 :-

The computer will reboot and in the next step a window will appear like below image and prompt for user name and computer name.


Windows 7 Ultimate user and computer name

Then click on “Next” button.

Step 9 :-

Enter password and password hint that will help you in case if forget your password.


Windows 7 Ultimate password for your account

 Then click on “Next” button.

Step 10 :-

Type your Windows product key. Or you can also enter product key after completion of Windows installation.


 Windows 7 Ultimate product key

Then click on “Next”.

Step 11 :-

  Select one of the options from bellow.
- Use recommended settings.
- Install important updates only.
- Ask me later.

In these options better to select Use recommended settings.


Windows 7 Ultimate protection settings


Step 12 :-

Select Time zone and location from the list and then click on “Next” button.


Windows 7 Ultimate time and date settings


Step 13 :-

Select your computer’s current location. Windows will automatically apply the correct network settings based on the network’s location. Then click on “Next” button.


Windows 7 Ultimate computer's current location


Step 14 :-

Then your desktop will be appeared like bellow window. 


Windows 7 Ultimate start up

This is the final step in the windows 7 installation process.